AI Assistant Deployment
Once you've created and configured your ZipTier campaign, you're ready to deploy your AI Assistant and start engaging with your audience. ZipTier provides two flexible deployment options to fit your needs: a standalone hosted page or an embeddable widget for your own website.
Both options provide the full ZipTier AI Assistant experience with all your customizations, branding, and content. Choose the option that best fits your marketing strategy, or use both simultaneously for maximum reach.
Deployment Options Overview
After completing the campaign creation wizard, you'll see both deployment options on the confirmation screen, ready to copy and use.
Option 1: Standalone Page
Every campaign automatically gets a unique, shareable URL that hosts your AI Assistant on ZipTier's platform. This is the simplest deployment option and requires no technical setup.
How It Works
Your campaign link takes visitors directly to a full-page AI Assistant experience. The page displays your branding, greeting message, and all customizations configured during campaign setup.
Example URL:
https://acmeCon2026.ziptier.ai/chatHow to Use
- Copy the campaign link from your campaign confirmation or dashboard
- Share the link directly with your audience via:
- Email campaigns and newsletters
- Social media posts
- QR codes on printed materials
- Text messages or chat apps
- Presentation slides
Advantages
- Zero setup required — Just copy and share
- Works everywhere — Any device with a browser
- Full-screen experience — Distraction-free conversation
- Easy tracking — Simple URL for campaign analytics
- QR code friendly — Perfect for print materials and events
Best Practices
- Use URL shorteners (like bit.ly) for cleaner links in social media
- Create QR codes for event signage, business cards, or printed collateral
- Include clear call-to-action text when sharing (e.g., "Ask our AI Assistant")
Option 2: Website Embed
Embed the AI Assistant directly on your own website using a simple JavaScript widget. This adds a floating chat button that opens the full conversation interface without visitors leaving your site.
How It Works
Add a single <script> tag to your website. The widget displays a floating button (customizable style, text, color, and position) that, when clicked, opens your AI Assistant in a modal overlay.
Embed Code
<script
  src="https://chat.ziptier.ai/wgt/script/latest.js"
  data-chat-url="https://chat.ziptier.ai/bt/v1?id=1234567890"
></script>
Configuration Attributes
Required
| Attribute | Description |
|---|---|
src | The ZipTier widget script URL. Always use the latest script URL provided. |
data-chat-url | The full URL of your AI Assistant campaign link. |
Advanced Widget Customization
Use the optional attributes below to match the widget button to your brand and website design. All attributes are optional — omit any to use the default.
Button Style & Appearance
| Attribute | Default | Description | Values |
|---|---|---|---|
data-button-style | pill | Visual style of the launcher button | pill, fab, avatar, textbox |
data-button-text | Ask AI | Label on pill/avatar, placeholder on textbox, tooltip on FAB | Any string, e.g. Get Help |
data-button-color | #4F46E5 | Background color of the button | Hex color, e.g. #667eea |
data-button-text-color | #ffffff | Text / icon color on the button | Hex color, e.g. #000000 |
data-button-size | medium | Size of the launcher button | small, medium, large |
data-button-font | System font stack | Font family for button text | Inter, Roboto, Poppins, etc. |
data-button-corner | rounded | Corner style for pill, avatar, and textbox launchers | rounded, sharp |
data-button-animation | ON | Play a one-time bounce animation when the button first appears | ON, OFF |
Avatar Style (data-button-style="avatar" only)
| Attribute | Default | Description |
|---|---|---|
data-button-avtr-initials | First letter of button text | Initials shown inside the avatar circle (up to 3 characters) |
data-button-avtr-initials-color | #ffffff | Color of the initials text inside the avatar circle |
Button Position & Widget Size
| Attribute | Default | Description | Values |
|---|---|---|---|
data-button-position | bottom-right | Fixed position of the launcher button on screen | bottom-right, bottom-left, bottom-center |
data-widget-width | 400px | Width of the chat widget panel | 400px–600px |
data-widget-height | 800px | Height of the chat widget panel | 400px–800px |
Complete customization example:
<script
  src="https://chat.ziptier.ai/wgt/script/latest.js"
  data-chat-url="https://chat.ziptier.ai/bt/v1?id=1234567890"
  data-button-style="pill"
  data-button-text="Ask AI"
  data-button-color="#667eea"
  data-button-text-color="#ffffff"
  data-button-size="large"
  data-button-font="Inter"
  data-button-corner="rounded"
  data-button-position="bottom-right"
  data-widget-width="400px"
  data-widget-height="800px"
></script>
Launcher Button Styles
| Style | Description | Best for |
|---|---|---|
pill | Rounded button with chat icon and label text (default) | Most websites — visible and descriptive |
fab | Round floating action button with chat icon only, no label | Minimal footprint; icon is universally recognized |
avatar | White card with agent avatar circle and name — conveys a human presence | High-touch sales or support experiences |
textbox | Search-bar style with a text input. Users can type a question before opening the chat; the message is auto-sent as the first message. | Product pages where users arrive with a specific question |
Advantages
- Seamless experience — Visitors stay on your website
- Contextual help — Provide assistance exactly where users need it
- Brand consistency — AI Assistant appears as part of your site
- Multiple pages — Add to any page on your site
- Customizable appearance — Four launcher styles, full color and font control
Widget Builder Playground
Before embedding the widget on your website, marketers can use the Widget Builder Playground to experiment with all available JS tag parameters in real time — no code required. Adjust button style, text, color, size, font, position, corner style, bounce animation, and widget dimensions, then instantly see how the widget will look on a simulated web page across desktop, tablet, and phone viewports. Once you're happy with the configuration, copy the generated embed code directly from the playground.
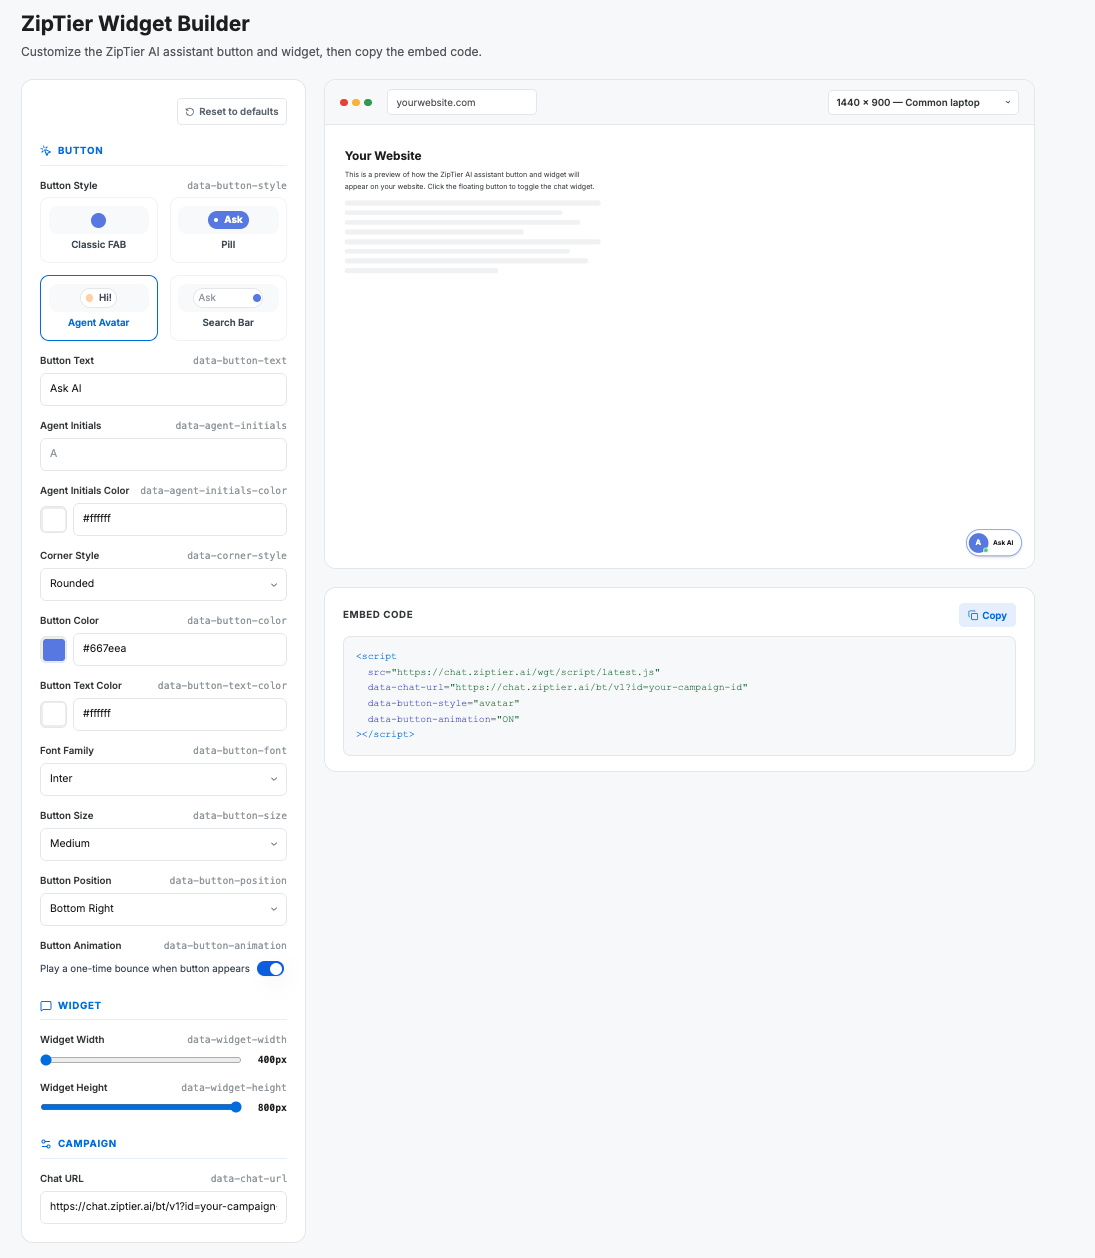
Try it out → Open the Widget Builder Playground to configure your widget visually and copy the ready-to-use embed code.
Website Embed Installation
Basic Installation
Add the script tag just before the closing </body> tag:
<!DOCTYPE html>
<html>
<head>
  <title>Your Page</title>
</head>
<body>
  <!-- Your page content -->

  <!-- ZipTier AI Assistant -->
  <script
    src="https://chat.ziptier.ai/wgt/script/latest.js"
    data-chat-url="https://chat.ziptier.ai/bt/v1?id=1234567890"
  ></script>
</body>
</html>
Platform-Specific Instructions
WordPress
- Go to Appearance > Theme Editor (or use a plugin like "Insert Headers and Footers")
- Locate your theme's
footer.phpfile - Paste the script tag just before
</body> - Save changes
Shopify
- Go to Online Store > Themes
- Click Actions > Edit Code
- Open
theme.liquid - Paste the script tag just before
</body> - Save changes
Webflow
- Go to Project Settings > Custom Code
- Paste the script in the Footer Code section
- Publish your site
Squarespace
- Go to Settings > Advanced > Code Injection
- Paste the script in the Footer section
- Save changes
Customization Examples
Search-bar launcher with pre-filled message:
<script
  src="https://chat.ziptier.ai/wgt/script/latest.js"
  data-chat-url="https://chat.ziptier.ai/bt/v1?id=1234567890"
  data-button-style="textbox"
  data-button-text="What would you like to know?"
></script>
Agent avatar launcher:
<script
  src="https://chat.ziptier.ai/wgt/script/latest.js"
  data-chat-url="https://chat.ziptier.ai/bt/v1?id=1234567890"
  data-button-style="avatar"
  data-button-text="Ask Alex"
  data-button-avtr-initials="AL"
  data-button-color="#667eea"
></script>
Custom button text for a product page:
<script
  src="https://chat.ziptier.ai/wgt/script/latest.js"
  data-chat-url="https://chat.ziptier.ai/bt/v1?id=1234567890"
  data-button-text="Ask Our AI About This Product"
></script>
Left-side positioning with bounce animation:
<script
  src="https://chat.ziptier.ai/wgt/script/latest.js"
  data-chat-url="https://chat.ziptier.ai/bt/v1?id=1234567890"
  data-button-position="bottom-left"
  data-button-animation="ON"
></script>
Choosing the Right Option
Use this guide to determine which deployment option works best for your specific use case. Remember, you can use both options simultaneously.
| Use Case | Recommended | Why |
|---|---|---|
| Email marketing campaigns | Standalone Page | Easy to include a clickable link |
| Social media posts | Standalone Page | Direct link works across all platforms |
| QR codes (print, signage) | Standalone Page | Simple URL converts to clean QR code |
| Product landing pages | Website Embed | Contextual help while browsing products |
| Event registration pages | Website Embed | Answer questions without leaving registration flow |
| Support/FAQ pages | Website Embed | Instant AI assistance for common questions |
| Webinar follow-up | Both | Link in email + embed on resources page |
| Trade show booth | Standalone Page | QR code on signage for attendees |
| Customer portal | Website Embed | Integrated help within existing experience |
Troubleshooting
Standalone Page Issues
- Link not working — Verify the campaign is within its active date range
- Wrong content displaying — Confirm you're using the correct campaign ID
- Page not loading — Check your internet connection and try refreshing
Website Embed Issues
- Widget not appearing
- Check the data-chat-url matches your campaign link
- Verify campaign is within its active date range
- Look for JavaScript errors in browser console
- Disable ad blockers that may interfere with third-party scripts
- Widget positioned incorrectly
- Your site's CSS may override widget positioning
- Try switching between
bottom-rightandbottom-left
- Widget conflicts with other elements
- Other floating elements (cookie banners, chat widgets) may overlap
- Check z-index conflicts in your site's CSS
Best Practices
- Use both options strategically — Standalone links for outbound campaigns, embedded widget for inbound traffic
- Match button style to context — Use
textboxon product pages where users arrive with specific questions,avatarfor high-touch experiences,pillorfabfor general use - Match button text to context — Use descriptive text like "Event Help", "Product Questions", or "Get Answers"
- Test across devices — Verify both options work on desktop and mobile browsers
- Monitor your campaign dates — The AI Assistant only functions within your configured start and end dates
- Track engagement — Use ZipTier analytics to see how users interact with your AI Assistant across both deployment methods
Need help? Visit our support portal for assistance with deployment or customization.